Open topic with navigation
Maintaining Workflow Authorisations
- This screen is used to set up the Authorisation amount associated with the Workflow Steps for a user Role.
- Workflow Authorisation is only applicable for transactional type records that have an amount associated with them eg. Purchase Orders, Creditor Invoices, etc.
Menu
| File |
> |
Security |
> |
Workflow Authorisations |
Mandatory Prerequisites
Prior to creating Workflow Authorisations, refer to the following Topic:
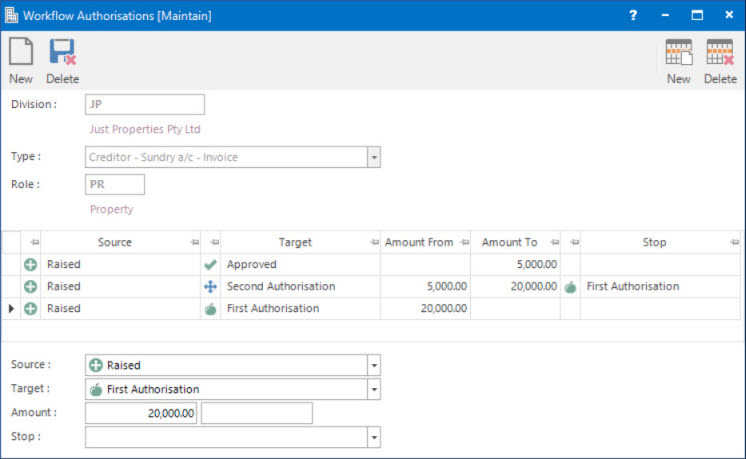
Screenshot and Field Descriptions

 Division: this is the division to set up the Workflow authorisations for. It will default to the division that the user is logged into.
 Type: this is the type of record the Workflow authorisations are created for, such as Purchase Orders, Creditor / Landlord Invoices etc.
 Role: this determines the user Role to set up the Workflow authorisations for.
Workflow Authorisations table: this is populated with the authorisation rules associated with the Workflow Steps for the selected user Roles.
Source: this is the list of Workflow Steps to select to set up the authorisation for.
Target: this is the Workflow Step required for authorisation.
Amount: this is the authorisation amount range provided for the selected Workflow Step.
Stop: this is for restricting how far the user can proceed prior to the need to re-authorise further.
For example, the screen shot above specifies that a User in the selected Role can change the Workflow Step from Raised to Approved if the Work Order is no more than $5000.
How Do I : Add a new Workflow Authorisation
- Change the default value in the Division field if required.
- In the Type field, select a type of entity from the drop down list to set up the Workflow authorisations for.
- In the Role field, enter the user Role to set up the Workflow authorisations for.
- In the Source drop down list, select the required Workflow Step to set up the authorisation for.
- In the Target drop down list, select the Workflow Step required for authorisation.
- In the Amount field, enter the authorisation amount range for the selected Workflow Step.
- In the Stop drop down list, select the Workflow Step up to which the authorisation is valid for.
- Click the Application tool-bar push button: Add.
- Confirm that you wish to save the new record.
How Do I : Modify an existing Workflow Authorisation
- Change the default value in the Division field if required.
- In the Type field, select a type of entity from the drop down list to change the Workflow authorisations for.
- In the Role field, enter the user Role to change the Workflow authorisations for.
- For the maintenance of the Workflow Authorisations table, the user has the following options:
- Add a new authorisation rule by entering the required values on the Source, Target and Stop fields, entering the authorisation Amount range values and clicking the Right Hand Side Application tool-bar push button: Add to add the authorisation rule to the Workflow Authorisations table.
- Change an existing authorisation rule by double clicking a line in the Workflow Authorisations table table and modifying any values on the Source, Target, Stop and Amount fields if required, and clicking the Right Hand Side Application tool-bar push button: Change.
- Delete an existing authorisation rule by double clicking a line in the Workflow Authorisations table table and clicking the Right Hand Side Application tool-bar push button: Delete.
- If any of the authorisation rules need to be cleared, click the Right Hand Side Application tool-bar push button: Wipe.
- Click the Application tool-bar push button: Change.
- Confirm that you wish to change the record.
How Do I : Delete an existing Workflow Authorisation
- Change the default value in the Division field if required.
- In the Type field, select a type of entity from the drop down list to set up the Workflow authorisations for.
- In the Role field, enter the user Role to set up the Workflow authorisations.
- Click the Application tool-bar push button: Delete.
- Confirm that you wish to delete the record.
Related Topics
Workflow Authorisations are associated with the following Topics:


![]() Division: this is the division to set up the Workflow authorisations for. It will default to the division that the user is logged into.
Division: this is the division to set up the Workflow authorisations for. It will default to the division that the user is logged into.![]() Type: this is the type of record the Workflow authorisations are created for, such as Purchase Orders, Creditor / Landlord Invoices etc.
Type: this is the type of record the Workflow authorisations are created for, such as Purchase Orders, Creditor / Landlord Invoices etc.![]() Role: this determines the user Role to set up the Workflow authorisations for.
Role: this determines the user Role to set up the Workflow authorisations for.